The following procedure describes how to connect to a remote server. It includes information on how to select options on the Remote Desktop Connection dialog tabs. The connection settings for your user name are automatically saved and used the next time you connect, so it is not necessary to open the Options dialog again unless you wish to change one or more settings. Ensure that non-DeltaV users do not have authorization to access the server desktop; trust relationships with other systems may accidentally permit this access.
If you connect from a remote client to a DeltaV workstation that is running the Windows workstation operating system and where another user is logged on to the local DeltaV workstation, you cannot run DeltaV Operate from the remote client. To run DeltaV Operate from a remote client, have the other user log off the local DeltaV workstation.
To start a remote session from a client node
- From the Windows taskbar,
navigate to
Remote Desktop Connection from the
Start menu. (It is preferable that a Remote
Desktop shortcut be provided for all users.)
Note
If you intend to run DeltaV Operate in a multiple monitor configuration through a remote connection, start the Remote Desktop Connection program with the /span option by typing the following at a command prompt:
Mstsc /span
- In the Remote Desktop Connection dialog, either browse for the name of the Remote Client server to which you want to connect or type its name in the Computer field.
- Click the Options button to expand the Connection dialog.
- On the General tab, type your user name and password.
- Make other connection choices for sound, color, connection speed, etc., on the other tabs.
- If you wish to save the
settings in a file, click the
Save As button on the
General tab to save the settings in a file.
Note
Even if you do not save the settings in a file, the settings are automatically saved and will be used the next time your user name connects. You need to save the file only if you wish to create a shortcut for your desktop or if you wish to have multiple preconfigured connection files for different servers, connection speeds, etc.
- Click Connect. It will take a few seconds for DeltaV software to initialize.
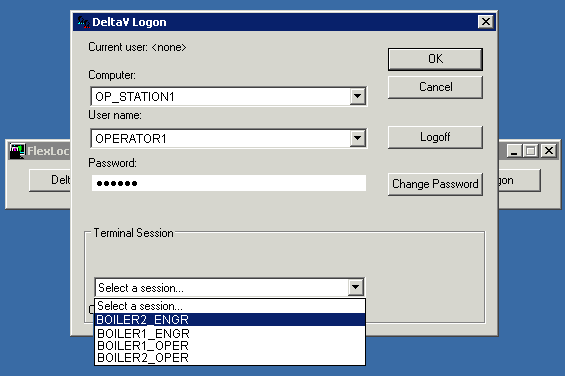
- On the DeltaV logon dialog, the server computer name and your user name appear in the Computer and User name fields, respectively. Enter your password and select a session. Only those sessions that are available for your use (as defined by the reserved lists and not in use by another Remote Client node) appear in the list of sessions from which to choose.
- After selecting a session, click OK.
Depending on your user privileges and the license assigned to your terminal session, you will then have access through the FlexLock system to one or more of the following: the Windows Desktop, the DeltaV desktop, or the operator application (DeltaV Operate or DeltaV Live).