The Graphics Studio user interface (UI) contains three main areas: the ribbon, the Explorer view, and the Documents workspace. The following sections provide more detail about each area of the UI.

Graphics Studio ribbon
The ribbon, similar to the Microsoft ribbon, contains a menu bar that provides quick access to commonly used commands and tasks. The tab selected in the ribbon determines the available menu bar options. (See the topic called The Graphics Studio ribbon for all of the available commands and tasks.)
Graphics Studio Explorer view
The Explorer view provides a folder system for organizing and managing all items in your DeltaV Live configuration database. This view contains two panes, the Graphics Explorer pane and the Library Explorer pane. These panes can be floated, moved, or docked to another location on the interface, or docked as tabs in the Documents workspace view. Double-click an item in the Explorer view to open it as a document tab and see its contents in the document editing area.
By default, the Explorer panes share the same space on the UI; to switch between panes, click the tabs at the bottom of the pane. The Explorer panes also share some ribbon commands, such as the New command; therefore, to perform certain operations, the appropriate pane must be selected as active.
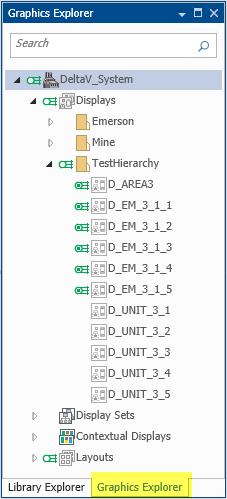
- Graphics Explorer pane
-
The Graphics Explorer pane provides a folder system for organizing and managing displays, contextual displays, display sets, and layouts. This pane contains a permanent, top-level folder for each type of configuration. Additional subfolders can be created under each configuration's permanent folder.
You can do the following from the Graphics Explorer pane:- Create graphics configuration and subfolders (under their respective folders)
- Rename graphics configuration and user-created folders
- Move graphics configuration and user-created folders
- Delete graphics configuration and user-created folders
- Search for displays, display sets, contextual displays, or layouts by name. In the Search field, enter the character or characters for which you want to search. All elements not containing that character sequence are filtered out. (You cannot search for folder names.)
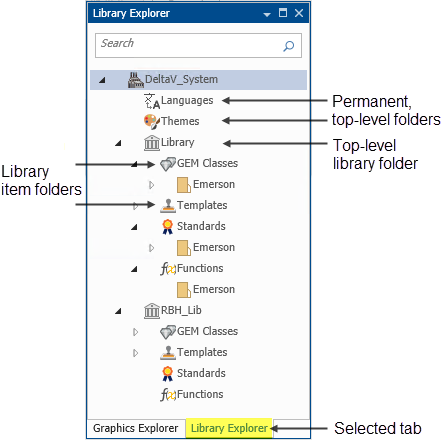
- Library Explorer pane
-
The Library Explorer pane provides a folder system for organizing and managing languages, themes, and library items (GEM classes, templates, standards, and functions). This pane contains a permanent, top-level folder for languages, for themes, and for each configuration library. Each configuration library contains a permanent folder for each type of library item.
You can do the following from the Library Explorer pane:- Create new configuration libraries
- Create subfolders under each library item's root folder
- Add new languages, themes, GEM classes, templates, standards, and functions (under their respective folders)
- Rename configuration libraries, library items and user-created folders
- Move library items and user-created folders
- Delete library items and user-created folders
- Search for GEM classes, templates, standards, or functions by name. In the Search field, enter the character or characters for which you want to search. All elements not containing that character sequence are filtered out. (You cannot search for folder names.)
Graphics Studio documents workspace
The documents workspace is where you view and edit the content of the selected configuration, container, or folder. This view contains the Palette pane, Selection pane, Graphics Configuration pane, document editing area, and document tabs.
The documents workspace contains the Palette pane, Selection pane, Graphics Configuration pane, document editing area, and document tabs. The panes in this view can be floated, moved, or docked in another location of the interface, or docked as tabs.
- Selection pane
-
The Selection pane is available when a display, contextual display, layout, or GEM class is active in the document editing area. This pane hierarchically lists all elements that are on the active configuration (in the document editing area), and provides another means for viewing, selecting, and commanding these elements. Right-click on any element in this pane to open a context menu, from which you can do the following:
-
Hide or show elements on the document editing area
Hiding elements that you are not currently working with reduces clutter in the editing area.
-
Lock or unlock elements on the document editing area
Locking elements prevents them from being moved, which allows locked elements to remain unaffected while grouping and moving unlocked elements.
The Selection pane also provides a Search tool through which you can search the names of all elements in the active configuration. In the Search field, enter the character or characters for which you want to search. All elements not containing that character sequence are filtered out.
By default, the Selection and Palette panes share the same space on the UI; to switch between panes, click the tabs at the bottom of the pane. Additionally, the Selection pane can be opened from the following ribbon commands: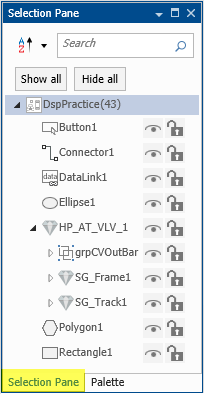
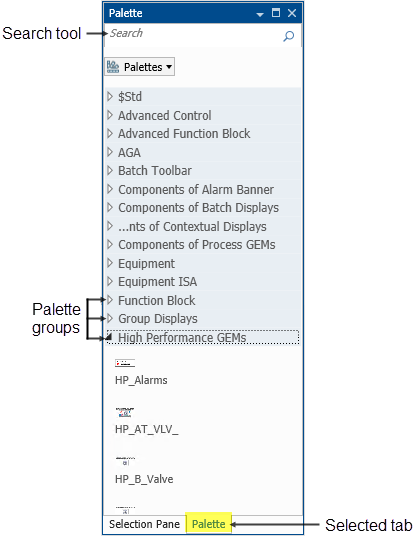
- Palette pane
-
The Palette pane contains the graphic elements available for adding to layouts, displays, and GEM classes. This pane is divided into groups (palettes) of similar elements. The elements available in this pane depend on the type of graphics configuration selected as the active tab. Drag and drop an element from the Palette pane onto the editing canvas to create an instance of the element.
The Palette pane also provides a Search tool through which you can search the names of all elements in the Palette pane. In the Search field, enter the character or characters for which you want to search. All elements not containing that character sequence are filtered out.
Quick Access Toolbar
In addition to the three main areas, the Graphics Studio UI also contains a Quick Access toolbar that provides permanent visibility for commonly used commands such as Save, Undo, Redo, and Publish. This toolbar is located by default in the upper right corner of the UI, but it can be relocated to just below the ribbon from the toolbar's right-click context menu. To add ribbon commands to the toolbar, right-click on the desired command and select Add to Quick Access Toolbar. You can remove commands from the toolbar from its right-click context menu.
Arranging your Graphics Studio UI
- Graphics Configuration pane
-
Use the Graphics Configuration pane to configure the properties of the selected item. The properties are organized into tabs, such as Basics, Text, and Interaction. Each tab then divides the properties into property groups, such as Fill, Line, and Visibility. Some properties have a diamond next to them. Clicking the diamond opens a context menu from which you can animate the property or reference other configurations. A colored diamond indicates that the property currently contains an animation or reference.

- Document editing area
-
The document editing area provides the space for showing and editing the content for the active graphic configuration, library item, or folder. For example, when a display, layout, or GEM class is selected as the active tab, the document editing area serves as the editing canvas for adding and manipulating graphic elements. Or, when a library function is selected as the active tab, the document editing area serves as the configuration area for the function. Or, when a Languages, Themes, or library items folder (such as Standards) is selected as the active tab, the document editing area shows the folder contents. The document editing area is also where the Translation Guide and Themes Guide appears.
- Document tabs
If two panes are sharing the same space on the UI, click the tabs at the bottom of the pane to switch between them. If you close a pane, you can reopen it from the ribbon's View tab, using the Pane command's drop-down menu.