This section provides source code examples that show how to manipulate DeltaV Operate pictures using VBA. After reading this section, you will be able to do the following tasks entirely through VBA scripts:
This section also describes some important characteristics of using VBA scripting in your pictures.
Understanding Picture Events
Each picture you create executes events when you open or close it. By writing a script for each event's handler, you can automatically complete specific task (such as initialization of variables) when a picture opens or closes.
The events that a picture executes vary depending on the DeltaV Operate environment. The following tables summarize the picture events that occur.
If you open a picture with an OpenPicture subroutine, the open events (Initialize and Activated) execute immediately. However, if the OpenPicture call is inside looping or branching structure (such as a FOR loop or an IF statement) then the open events do not fire until the OpenPicture script completes.
Conversely, if you close a picture with a ClosePicture subroutine, the Close event of the picture being closed never fires because the picture is removed from memory before its script has a chance to run.
Pictures also execute Activated and Deactivated events as you switch from one picture to another. The Activated event occurs whenever of picture gains focus. The Deactivated event executes when a picture loses focus. For example, suppose you have two pictures open and the first picture, Picture1, has focus. When you select the second picture, Picture2, Picture1 executes the Deactivated event and Picture2 executes the Activated event. When you switch back, Picture2 executes the Deactivated event and Picture1 executes the Activated event.
Automatically Starting a Picture
This section describes how to create a run-time environment that contains a virtual toolbar and several pictures of the same size.
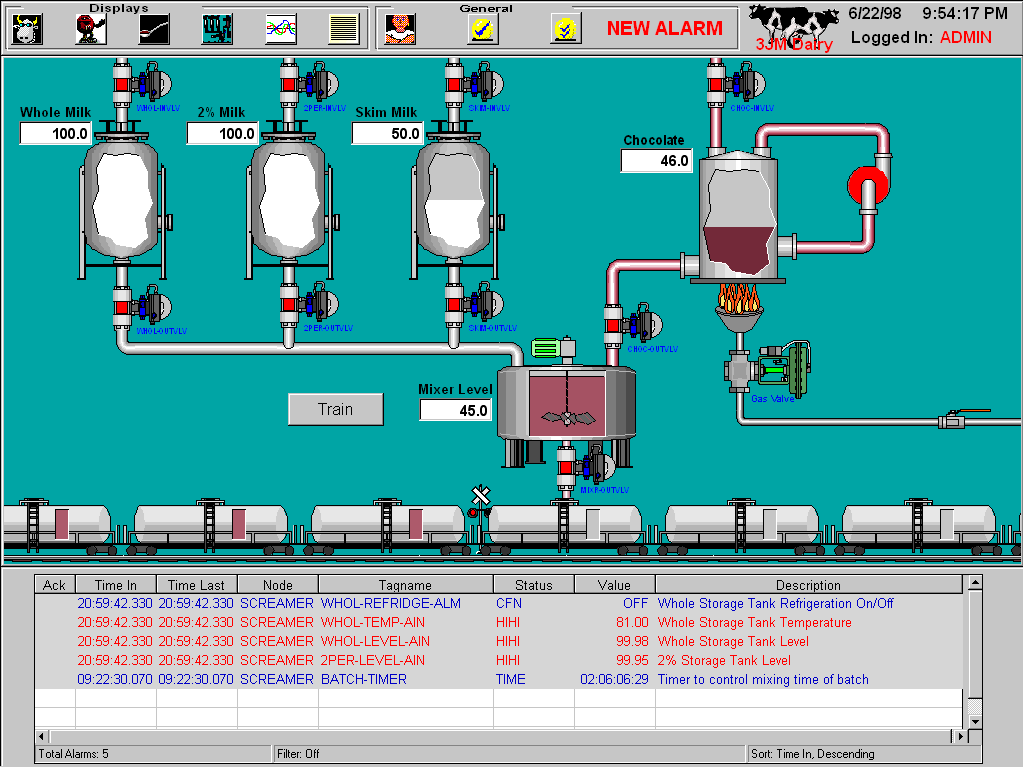
The figure below shows a typical picture design, consisting of three untitled pictures: a main picture, a navigational banner, and an alarm banner.
Since the main picture has to be a certain size and position in the run-time environment, you may want to create a toolbar button to create pictures of the same size to fill the main process picture area. To do so, you must first create a picture area, navigation (or toolbar) area, and other run-time areas that are reserved as "special pictures". After creating these pictures, write down the following coordinates of the pictures so it will be easier to enter them into the script:
These coordinates can be found in the Properties window for the picture.
When opening pictures through scripts, you may want to remove any unwanted scrollbars by executing the FitWindowToDocument method, which is also illustrated in this code sample.
Let's take a look at the toolbar script. Wherever possible, comments are provided to help you understand that particular part of the script. These bold-faced comments will appear by default as green text when pasted into the VBA code window. Comment colors are configured in the VBA Option dialog.
Example: Creating a Toolbar
Dim iNewDoc As Object
Dim iPage As Object

'Create a new picture.
Set iNewDoc = Application.Documents.Add("FIX.PICTURE")
Set iPage = iNewDoc.Page
With iPage

    'Set the height of the document.
    .DocumentHeight = 51.3

    'Set the width of the document.
    .DocumentWidth = 100.44

    'Call the FitWindowToDocument method to expand the
    'window size so it matches the size of the document.
    'This action removes all scrollbars.
    .FitWindowToDocument
    .windowtoppercentage = 7.03
    .windowleftpercentage = 0#
    .titlebar = False

End With
Set iNewDoc = Nothing
Set iPage = Nothing
Managing Multiple Displays
Notice that there is a virtual toolbar at the top of the display in the previous illustration. The buttons on this toolbar are actually bitmaps that have their ButtonStyle property set to Pushbutton.
Setting a Pushbutton Property
To set the Pushbutton property of a bitmap:
-
From DeltaV Operate, select Bitmap from the Insert menu to insert a bitmap into your picture.
-
Right-click the bitmap and select Button Styles, PushButton from the pop-up menu. A 3D effect will appear around the bitmap to give it the appearance of a button.
-
Optionally, you can configure a second bitmap to be displayed when the button is depressed. To do this, right-click the bitmap and select Load Image, Secondary. You can also configure a ToolTip by entering the desired text for the ToolTip into the Description property of the bitmap and setting the EnableTooltips property to TRUE.
The top toolbar is actually a separate picture with no titlebar. Clicking a button in this area changes focus and changes what is known in VBA as the ActiveDocument. To be sure that the correct picture is operated on when you click the toolbar button, you should first set the active document.
Setting the Active Document
To set the active document, you need to create a variable object to hold the main picture name, or picture alias. In the code that follows, a variable object is used because the script requires multiple main pictures to be opened. If you use an alias instead of a variable, an error would occur if the alias was set to the same name ("MainPicture"), when more than one main picture is opened at the same time.
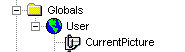
Creating a Global Variable
To work with the script in this section, you must first create a global variable object to hold the string that represents the current active picture. To do this:
-
Right-click the User icon in the Globals folder of the DeltaV Operate system tree and select Create Variable from the pop-up menu.
-
Set the Name property to CurrentPicture and the VariableType property to 8 - vtString. The system tree should look like the following:
Once you have created the variable, add the following code to the Activate method of the main picture to set a Global variable:
Private Sub CFixPicture_Activated()

'Set the user global variable when you activate to find
'out the name of current active picture.
user.CurrentPicture.CurrentValue = Me.FullyQualifiedName

'Me is a VB intrinsic variable that tells you the name
'of the current project (picture object).
End Sub
The Global variable lets you know which main picture has focus so the toolbar can act on it. Now you can add the following script to the bitmap object by right-clicking it and selecting the Edit Script command from the pop-up menu:
Dim PicObj As Object

'Loop through the documents that are open.
For Each PicObj In Application.Documents
'If the document that is open has the same name as the
'current active main picture, set the active property,
'which will in turn set the active document.
If PicObj.Name = user.CurrentPicture.CurrentValue Then
    PicObj.active = True
    'Acknowledge alarms of the selected items in the
    'active picture.
    AcknowledgeAnAlarm
    Exit Sub
End If
Next PicObj
Changing Displays Using Global Subroutines
The FactoryGlobals global subroutines provide you with commands that allow you to manage your operator displays. Picture management subroutines include:
Refer to the Subroutines topic of the Automation Interfaces Help file for more information on calling these subroutines.
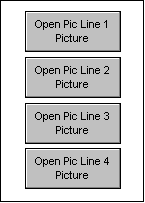
In the next example, an overview display contains four push buttons that allow operators to monitor plant lines. The first button opens the first line picture, the second button opens the second line picture, and so forth.
The VBA scripts that make the command buttons operational are provided in this section. The use of aliases (in the following script, Line is the name of an alias) gives the script control over the opening and closing of displays, regardless of the exact picture names. Each time the operator selects the appropriate button, the script closes any picture with an alias of Line, and reassigns the alias to the opened picture.
Example: Using an Alias to Open and Close Displays
Private Sub OpenLine1Command_Click()
    ClosePicture "Line"
    OpenPicture "Line1", "Line"
End Sub

Private Sub OpenLine2Command_Click()
    ClosePicture "Line"
    OpenPicture "Line2", "Line"
End Sub

Private Sub OpenLine3Command_Click()
    ClosePicture "Line"
    OpenPicture "Line3", "Line"
End Sub

Private Sub OpenLine4Command_Click()
    ClosePicture "Line"
    OpenPicture "Line4", "Line"
End Sub
The following script performs the same function using the ReplacePicture subroutine, without using aliases. With ReplacePicture, all pictures display in the same window:
Example: Using the ReplacePicture Subroutine
Private Sub OpenLine1Command_Click()
    ReplacePicture ("Line1")
End Sub

Private Sub OpenLine2Command_Click()
    ReplacePicture ("Line2")
End Sub

Private Sub OpenLine3Command_Click()
    ReplacePicture ("Line3")
End Sub

Private Sub OpenLine4Command_Click()
    ReplacePicture ("Line4")
End Sub
Closing Pictures with Active Scripts
A script cannot be fully executed if the picture containing it is closed or replaced. Therefore, if you use the Close method on the picture which contains the active script, the Close method should appear as the last method in the script. Otherwise, the picture closes before the rest of the script can run.
Remember that some command subroutines, such as ReplacePicture and ClosePicture, contain the Close method, so they are also affected.