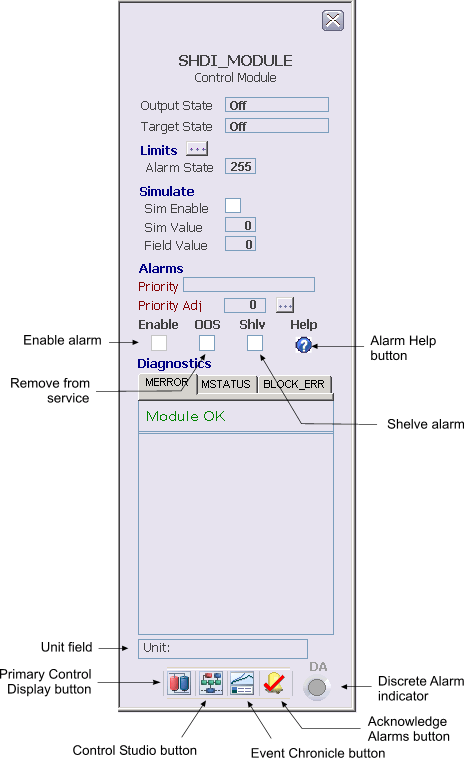
- Output State — The current state of the block.
- Target State — The
desired state of the device.
Note
Entries in this field are case sensitive and must match exactly the named state string in the referenced named set (the default is $discrete_hart_states). Alternatively you can enter the named state value. For example, entering 5 displays Open.
- Alarm State — This field displays the discrete state value (1 or 0) for which a discrete alarm is generated. Click this field to enter a value. The valid inputs for this value range from 0 to 255. A value greater than 1 prevents an alarm condition from occurring.
- Simulate
- Sim Enable - This check box is used to enable or disable the simulate value as input to the discrete input. When the check box is checked, the simulate value is used as the PV input.
- Sim Value - This value is used as the Boolean form of the PV input when simulate is enabled. Sim Value is the simulated field value. Click this field to enter a value.
- Field Value - Determines the PV input when simulate is disabled. This value is the actual Boolean field value. The Boolean field value is read-only and can have a value of 0 or 1.
-
Alarms
-
Priority - This field displays the priority (such as Warning, Critical or Advisory) that is assigned to the corresponding alarm.
-
Priority Adj - This button is used to decrease the alarm priority at run time. If a module has more than one alarm configured, the alarm priorities are all reduced by the same value, except that the lowest priority that will be set is 3, a logged event. (For example, if a module has three alarms, configured with alarm priorities of 12, 8, and 5, and a priority adjustment of 5 is made, the run-time alarm priorities will be set to 7, 3, and 3, respectively.) The configurable alarm priority held in the PRI field of each alarm parameter remains unchanged. Therefore, setting the priority adjustment back to 0 reestablishes the original priority levels (in the above example, 12, 8, and 5).
-
Enab - This checkbox is a read-only indication of the corresponding alarm's ENAB (enabled) state.
-
OOS - This check box is used to remove or restore the corresponding alarm from or to service.
-
Shlv - This check box is used to shelve or unshelve the corresponding alarm.
-
Help - This button launches the Alarm Help available for the corresponding alarm.
-
-
Diagnostics — The Diagnostics box is divided into two parts. In the top part of the box, a summary of the module status is given. This summary includes information on whether any of the following are indicated for the module. If an error has occurred in the module, a Clear Error button is displayed in the top right corner of the box. Click this button to clear the error when it is no longer active, and the button disappears.
The bottom part of the box displays any errors that occur. If an error is displayed, a button is displayed in the upper-right corner of the lower portion of the Diagnostics box. Click this button to open the Event Chronicle, which shows the module occurrences.
- Discrete Alarm indicator — The letters DA (Discrete Alarm) above the alarm indication appear dark gray when the alarm is not enabled. Otherwise, the color of the letters correspond to the alarm priority of the alarm. The alarm indication below the text designation also appear dark gray when the alarm is not enabled and appears black when the alarm is enabled but not active. Otherwise, the color of the alarm indication to the alarm priority of the alarm when the alarm is enabled and active. When an alarm occurs, the alarm indication blinks the alarm's priority color until it is acknowledged. The crosshatches indicate that the alarm is currently inactive and is still unacknowledged.