The Advanced Continuous Historian

Configure the Advanced Continuous Historian

Only one Continuous Historian subsystem can be enabled on each Application Station. However, you can install the Advanced Continuous Historian on more than one Application Station.

To collect or display historical data with the Advanced Continuous Historian after installing it on an Application Station, you must complete the following configuration steps to set up the Continuous Historian subsystem and configure the Advanced Continuous Historian:

  1. Define history collection for module and node parameters.
  2. Assign modules to commissioned controllers or Application Stations.
    Note

    If you do not assign the module to an Application Station or a commissioned controller, historical data will not be collected for the module.

  3. Download the controller or Application Station.
  4. In DeltaV Explorer, right-click the Continuous Historian subsystem under the Application Station, and then select Properties.
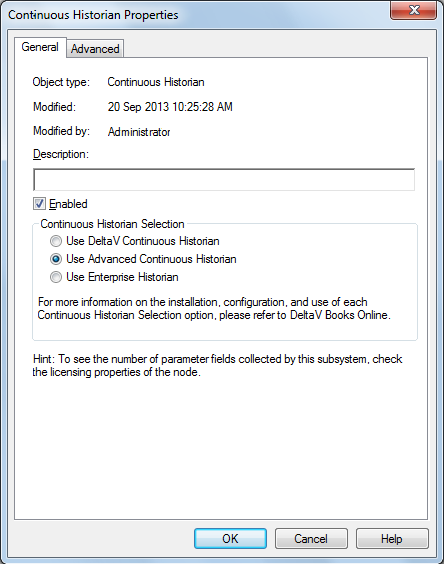


  5. In the Continuous Historian Properties dialog, enable the Continuous Historian subsystem for each Application Station where you installed the Advanced Continuous Historian and select the Use Advanced Continuous Historian option.
  6. Assign specific area folders and nodes to the Continuous Historian subsystem.
  7. In DeltaV Explorer, download the Application Station.
    Note

    After the initial download of the history collection subsystem there may be a short delay before the overall integrity of the subsystem reports GOOD in DeltaV Diagnostics.

  8. Start the Windows Services application, and then complete the following tasks:
    1. Right-click the service named PIDeltaV_ACtr, and then select Properties.
    2. In the PIDeltaV_ACtr Properties dialog, click the Log On tab, change the service logon account to the DeltaVAdmin account, and enter the services password that you specified during Workstation Configuration.
    3. Restart the PIDeltaV_ACtr service.
    4. Right-click the service named Remote Application Monitor, and then select Properties.
    5. In the Remote Application Monitor Properties dialog, click the General tab, and then set the Startup type option to Automatic (Delayed Start).
    6. Restart the Remote Application Monitor service.
Note

To configure the parameters on the Advanced tab of the Continuous Historian Properties dialog, use the PI System Management Tools (PI SMT).

After configuring the Advanced Continuous Historian, you must create a trust to view historical data on a remote system.