DeltaV Operate VBA allows you to dynamically control your objects and pictures while you are working in the run-time environment. This topic focuses on how you can script your applications to perform a variety of functions at run time, such as:
-
Changing data sources.
-
Changing properties in objects, or in pens of a chart.
-
Entering data in global forms.
Changing Data Sources
This topic illustrates how you can write scripts that dynamically change the data source of objects "on the fly" at run-time. As discussed in Working with DeltaV Operate Objects, animating objects begins by making a connection to a data source. The first example shows you how to create direct connection while in the run-time environment.
When you change a data source at run time, the change does not remain intact when you switch back to the configuration environment. The behavior of the picture depends on the status of the picture cache. In addition, if you add or delete scripts in run mode, the picture will not be loaded into cache when it is closed. Refer to Using Picture Caching for more information.
Creating a Direct Connection to an Object
The following example connects an AI tag to the Horizontal Fill Percentage of a rectangle when you click it in the run-time environment.
-
Draw a rectangle on your screen.
-
Create an AI database Tag with RA as the I/O address (using the SIM driver).
-
Right-click the rectangle and select Edit Script from the pop-up menu.
-
Enter the following code in the rectangle's Click event:
Dim lstatus as Long
Rect1.Connect "HorizontalFillPercentage", _
"dvsys.AI.F_CV", lstatus
-
Switch to Run and Click the rectangle.
Before you click the rectangle, it is solid. After you click it, the rectangle starts to fill based on the AI tag's value. You have dynamically connected the rectangle's fill level to the database tag.
Example: Changing the Data Source of an Animation Connected to an Object
As discussed in Working with DeltaV Operate Objects, there are three different types of animation objects — Lookup, Linear, and Format. The example below shows you how to set an object, and change the source of the animation object that is connected to it while you are in the run-time environment.
-
Create an AI block (AI1) with RA as the I/O address, and another AI block (AI2) with RG as the I/O address.
-
Create two Data links. Connect one Data link to AI1, and connect the other to AI2.
-
Add a rectangle, and animate its Foreground Color (a Lookup object) using AI1 as the data source.
-
Now animate the fill of the rectangle (a Linear object), and use AI1as the data source.
-
Edit the rectangle's Click event.
-
Enter the following code:
Dim AllObj As Object Dim SingleObj As Object Dim Count As Integer Dim ObjCount as Integer 'Set AllObj equal to the collection of contained objects 'in the picture. Set AllObj = _ Application.ActiveDocument.Page.ContainedObjects 'Check how many objects are in the picture. For Each SingleObj In AllObj Count = AllObj.Count 'Look through all of the objects in the picture. While Count > 0 'If the current object (shape) has contained objects, 'check the number of objects (animations) it contains. If SingleObj.ContainedObjects.Count > 0 Then ObjCount = SingleObj.ContainedObjects.Count 'For each object contained in the current object, 'check its class name. While ObjCount > 0 Select Case _ SingleObj.ContainedObjects._ Item(ObjCount).ClassName 'If the contained object is a Lookup '(table), change the data source to 'DVSYS.AI2.F_CV Case "Lookup" SingleObj.ContainedObjects._ Item(ObjCount).Source = _ "dvsys.AI2.F_CV" 'If the contained object is a Linear object, 'change the data source to 'DVSYS.AI2.F_CV Case "Linear" SingleObj.ContainedObjects._ Item(ObjCount).Source = _ "dvsys.AI2.F_CV" End Select ObjCount = ObjCount - 1 Wend End If Count = Count - 1 Wend Next SingleObj -
Switch to the run-time environment and click the rectangle.
Both the Fill and Color animations change from the current value of AI1 to the current value of AI2.
Changing a Text Object's Caption
The following example changes the caption of text you have entered when you click on the text at run-time.
Changing a Variable Object's Current Value
This example shows you how to write a script that changes a Variable object's current value when clicking text at run time.
-
Create a Variable object.
-
Change the object's type to Long.
-
Create a Text object.
-
Using the Animations dialog box, animate the Text object's Caption using the Variable object's CurrentValue property as its data source.
-
Right-click the Text object and select Edit Script from the pop-up menu.
-
Enter the following code in the Text object's Click event:
Variable1.CurrentValue = Variable1.CurrentValue + 10
-
Switch to the run-time environment and click the Text object.
The caption of the Text object increments by 10 (as will the Variable's current value).
Changing the Data Source of a Data Link
This example details how to change the data source of a Data link in the run-time environment using the Format object.
-
Create an AI block with RA as the I/O address, and a DO block in the database.
-
Create a Data link and connect it to the AI block.
-
Right-click the Data link and select Edit Script from the pop-up menu.
-
Enter the following code in the Data link's Click event:
DataLink1.ContainedObjects.Item(1).Source = _
"dvsys.DO.F_CV"
-
Initialize the DO block, switch to the run-time environment, and click the Data link.
The caption of the Data link changes to the current value of the DO block.
Change a FIX Event's Data Source
To change the data source of a FIX event in the run-time environment:
-
Create an AI block and a DO block in Database Manager.
-
Create a new Picture.
-
Insert a FIX event.
-
Name the FIX event, and choose the AI block as a data source.
-
Add a rectangle to your picture. Right-click the rectangle and select Edit Script from the pop-up menu.
-
Enter the following code in the rectangle's Click event:
Dim obj As Object
Dim Count As Integer

'Set obj equal to the collection of objects contained in
'the active picture
Set obj =
Application.ActiveDocument.Page.ContainedObjects
Count = obj.Count
'Loop through all of the objects in the picture to find 'any that are Event objects. While Count > 0 'If the object is an Event object, change its source If obj.Item(Count).ClassName = "FixEvent" Then obj.Item(Count).Source = "dvsys.DO.F_CV" 'Display a message box that describes the change. MsgBox "The Fix Event " & obj.Item(Count).Name & _ " is now connected to the data source " & _ obj.Item(Count).Source End If Count = Count - 1 Wend -
Switch to the run-time environment and click the rectangle. The message box appears stating that the source has changed.
Replacing String Properties
You can use the FindReplace object to replace string properties of an object at run time. The following example uses the FindReplaceInObject method to accomplish this.
The code in this example searches through a group of objects within a picture and changes their data sources by replacing AO with AI.
-
Insert a Data link and assign dvsys.AO.F_CV as the data source.
-
Insert a rectangle and animate its HorizontalFillPercentage using AO as the data source.
-
Now duplicate the rectangle three times.
-
Select all the rectangles and group them.
-
Name the group "MyGroup".
-
Create a Push button by clicking . Right-click the Push button and select Edit Script from the pop-up menu.
-
Enter the following code in the Push button's Click event:
Dim Success As Boolean FindReplace.FindReplaceInObject MyGroup, 4, "AO", "AI",_ Success 'The 4 indicates to search through data sources only. -
Switch to the run-time environment and click the Push button.
The FindReplace object searches MyGroup and changes all instances of AO to AI. Because the Data link's data source falls outside of MyGroup, it remains unchanged.
Tag Search at Run Time
The Tag Search Utility allows wildcard searches of the combined area, name, and description text of database objects. The objects searched include modules, controllers, workstations, Wireless I/O cards (WIOCs), and CHARM I/O cards (CIOCs). The search generates a list of database objects that include the search text. You can select one of the objects listed and then perform any of the following actions from buttons on the utility (note that some actions may not be applicable to the object selected).
-
Open the object's faceplate
-
Open a module's detail display
-
Open a module's primary control display (if defined)
-
Open Control Studio online for a selected module
-
Open a Process History chart for the object
The search is performed on data that was downloaded at the time of the search. If newer data is available (a download was performed), perform a search to update the list of results.
The Tag Search button
 is found on the DeltaV
picture toolbars (for example, Toolbar_1280x1024_xp and Toolbar_1680x1050_xp;
OperatorKeyboardToolbar and OperKeyToolbar_1680x1050_XP; and, TSToolbar and
TSToolbar_1680x1050_XP toolbars). When one of the picture toolbars is included
on the picture, the operator can perform a tag search by clicking the Tag
Search button at run time. In a multiple monitor system, the toolbar is found
on the primary screen.
is found on the DeltaV
picture toolbars (for example, Toolbar_1280x1024_xp and Toolbar_1680x1050_xp;
OperatorKeyboardToolbar and OperKeyToolbar_1680x1050_XP; and, TSToolbar and
TSToolbar_1680x1050_XP toolbars). When one of the picture toolbars is included
on the picture, the operator can perform a tag search by clicking the Tag
Search button at run time. In a multiple monitor system, the toolbar is found
on the primary screen.
Tag Search Syntax
The following notations are permitted in the tag search:
-
# — matches strings containing any single digit from 0-9.
-
? — matches any single character.
-
* — matches zero or more characters.
-
literal special characters — #, ?, and * must be in square brackets to find the literal character. All other special characters match themselves.
-
[characterlist] — matches any single character in characterlist (can also include digits).
-
[!characterlist] — matches any single character not in characterlist (can also include digits).
-
Hyphen (-) — inside square brackets at the beginning of the characterlist (after an exclamation point if one is used) or at the end of characterlist matches itself. In any other location within square brackets, the hyphen identifies a range of characters delimited by the characters on either side of the hyphen.
-
When a range of characters is specified, they must appear in ascending sort order (that is, from lowest to highest). Thus, [A-Z] is a valid pattern, but [Z-A] is not.
Example search strings:
To use the tag search
-
Enter a search string in the field.
The contents of the list are updated as you enter characters.
-
Click on any line in the results list to select an object. The list can be sorted by clicking the column heading ( Area, Name, Description).
-
Click one of the action buttons (Faceplate, Detail, Graphic, and so on). Double-clicking the line opens the object's faceplate (if it exists).
Creating Global Forms for Data Entry
This example shows how to create a UserForm in the UserGlobals page and reference it from a picture for the purpose of data entry. Inserting run-time accessible forms in the User Globals page allows only one copy of the form on the system. This makes version control easier and minimizes the size of the picture files.
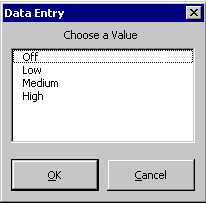
This example uses a form that you create in User Globals. The following figure shows how it should appear in the run-time environment.
This example contains a UserForm frmListEntry and a module UGSubs, both of which are located in Project_User. The name of the picture is LISTENTRY1.GRF.
Example: Form Code
Option Explicit
Dim strDataSource As String
'Custom subroutine to pass DataSource and List items to form
Public Sub SetupTheData(DataSource As String, _
Optional Item1 As String, Optional Item2 As String, _
Optional Item3 As String, Optional Item4 As String, _
Optional Item5 As String, Optional Item6 As String)
'Get the data source and any passed-in items for the list.
'This example uses six items, but there is no limit.

strDataSource = DataSource
    If Item1 <> "" Then EntryBox.AddItem Item1
    If Item2 <> "" Then EntryBox.AddItem Item2
    If Item3 <> "" Then EntryBox.AddItem Item3
    If Item4 <> "" Then EntryBox.AddItem Item4
    If Item5 <> "" Then EntryBox.AddItem Item5
    If Item6 <> "" Then EntryBox.AddItem Item6

End Sub

Private Sub CancelButton_Click()
    Unload Me

End Sub

Private Sub OKButton_Click()
    Dim DataObj As Object

    On Error GoTo ErrorHandler
    'Write the chosen value from the list to the tag.
    Set DataObj = System.FindObject(strDataSource)
    DataObj.Value = EntryBox.Value
    Unload Me
    Exit Sub
    ErrorHandler:
        MsgBox "Error " + Str(Err.Number) + " has occurred" _
        + Chr(10) + Chr(13) + Err.Description

End Sub
Example: Module Code
Option Explicit
'Declare the Form object.
'This must be in a Module to use the user-defined data type.
'The user-defined data type allows Quick Info and Auto
'Complete to work.
Public ListForm As frmListEntry
Public Sub GetListForm()
    'Creates a new instance of the form.
    Set ListForm = New frmListEntry

End Sub
Example: Object Code
Private Sub CommandButton1_Click()

    On Error GoTo ErrorHandler
    'Create an instance of the form.
    UGSubs.GetListForm
    'Pass in the tag to control and load the form list with
    'choices. Use text or numbers as appropriate for the
    'tag-field data type.
    UGSubs.ListForm.SetupTheData _
    "Fix32.BATCH1.BATCH-RECIPENAME.A_CV", _
    "Off", "Low", "Medium", "High"
    'Show the form.
    UGSubs.ListForm.Show
    Exit Sub
    ErrorHandler:
        HandleError

End Sub