Emerson Smart Firewall specifications

Access the Emerson Smart Firewall's web UI

This topic explains how to access the firewall's web user interface. The web user interface has an extensive online help system.

Note

If the security level of the Internet Explorer browser is set to High, it is likely that you will need to add the firewall's IP address to IE's list of trusted sites. Refer to Adding the Smart Firewall to Internet Explorer trusted sites.

Notes

Both Ethernet ports on the Smart Firewall are 10/100 auto-speed sensing and full/half duplex auto-negotiating. Do not configure any PC or switch port to either a fixed speed or duplex setting if it is to be directly attached to the Smart Firewall ports. Always let the connected devices auto-negotiate both speed and duplex with the Smart Firewall. Otherwise, communications could be negatively impacted and possibly stop.

Read the Safety instructions for the Emerson Smart Firewall before connecting or using the firewall.
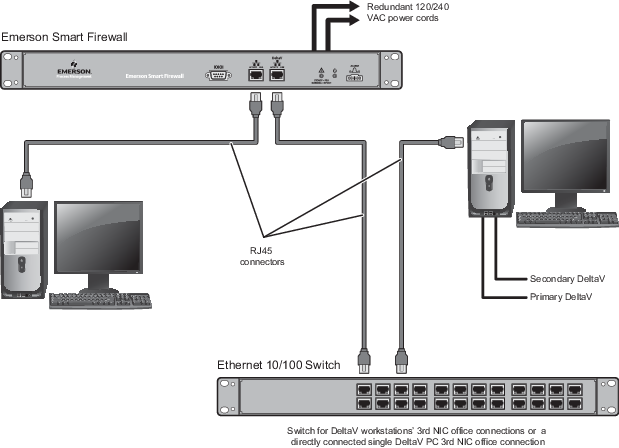
  1. Attach both of the included power cords to the AC mains.
    If the Power LED does not illuminate, ensure that the power feed is good (breakers, outlet strip switches/breakers). Refer to the troubleshooting topic for the location of the power LEDs.
  2. Attach a Cat. 5(e) Twisted Pair (TP) Ethernet cable with RJ45 connectors (100 meters/328 feet maximum) between the site's plant Ethernet switch or a plant network PC and the Smart Firewall's EXT (External/left side) port.


  3. Attach a Cat. 5(e) TP cable with RJ45 connectors (100 meters/328 feet maximum) between the DeltaV INT (right side) port of the Smart Firewall and the LAN Ethernet switch that is used for the DeltaV workstations' plant connections (sometimes called the third NIC).
    If there is only one DeltaV workstation communicating through the Smart Firewall, the Smart Firewall's DeltaV port can be directly connected to the workstation's third NIC.
  4. Verify all equipment is powered up.
  5. On the DeltaV PC that is connected to the Smart Firewall's INT port, open the Network Connections dialog from the Control Panel and select the third NIC.
  6. Set the third NIC's Internet Protocol (TCP/IP) properties to DHCP (Obtain an IP address automatically) and save this setting.
    This setting causes the Smart Firewall to assign the PC an IP address from its IP address pool.
    Note

    It may be necessary to restart the PC or to run the ipconfig/release and ipconfig/renew commands from a command prompt in order for it to obtain an IP address from the Smart Firewall.

  7. On the same PC (the PC connected to the firewall's DeltaV port), open Internet Explorer, enter 192.168.1.1, (the firewall's default IP address) in the address area, and click the green arrow or press Enter.
    If the certificate error security warning appears, select continue to open the Smart Firewall's web user interface (UI). The certificate error security warning appears because the Smart Firewall uses HTTPS for communications and does not currently provide security certificates for these communications.
  8. Log in to the Smart Firewall's web UI using the default credentials: user: admin and password: Emerson1.
    The admin password can be changed later. Refer to Smart Firewall's web UI online help for information on changing passwords.
    Note

    After 10 failed log in attempts, the firewall will block any log in attempts for one minute.

  9. Use the web UI's online help to assign a static IP address to the Smart Firewall's EXT (left side) port.