To prepare your development strategy, you must first plan the size of your window, the area of your screen that contains your picture. The sections that follow describe how to custom-design your window so that your pictures look the way you want them to.
Determining Window Size
When adjusting your picture size, you work with the window property, and you define the size as a percentage of screen. By sizing a window by the percentage of screen, DeltaV Operate autoscales your picture, maintaining its logical coordinate system and displaying the picture at the same size, regardless of the resolution of the monitor on which it is viewed.
The default window and document properties are displayed in the Picture Preferences tab of the User Preferences dialog box. These properties are applied when you create a new picture. The new picture's viewport is automatically set to display the maximum viewable amount of your picture at a 100% zoom ratio. For more information on zooming, refer to Controlling a Picture's Magnification in this topic.
To change the size of your window for all new pictures to be created, select a window size in the Window Size field. If you want to modify the default document width or height, make sure that the ratio between the width and height remains at 4:3 or 16:10, depending on the resolution of your monitor. You can select any units you wish; however, if you choose not to maintain the aspect ratio corresponding to your monitor resolution, objects with an identical width and height will not appear as such in the window. For more information on the logical-units-to-pixels ratio, refer to The Document in What Makes Up a Picture.
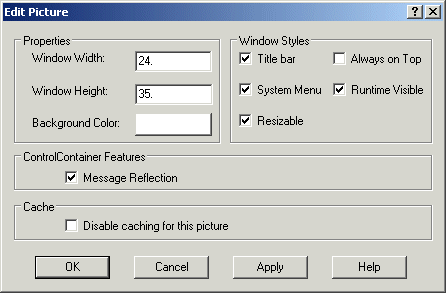
Once you create a picture, you can change its size by entering the desired logical units in the Edit Picture dialog box, shown in the following figure.
You can specify any logical units to represent the size of your picture. DeltaV Operate automatically maintains the ratio between logical units and pixels to preserve the size of the objects on the screen.
Manually Changing the Picture Size
By manually adjusting the size of the window, you can quickly change the view of your picture. Before you do so, make sure you know what document components you are changing in the picture. The following table shows the key sequences or mouse actions that change your picture size, and what part of the document you actually modify.
|
Pressing the key sequence... |
While... |
Does the following... |
And changes... |
|---|---|---|---|
|
<Shift> |
Clicking and dragging the mouse on an edge of the window |
Adjusts the size of the picture |
The window and the viewport |
|
<Ctrl><Shift> |
Clicking and dragging the mouse on an edge of the window |
Adjusts the size of the picture |
The window |
|
None |
Clicking an arrow on the scroll bar |
Scrolls the picture |
The viewport |
Controlling a Picture's Magnification
DeltaV Operate gives you many ways to change the appearance of your picture on screen or, conversely, keep it looking exactly the same so you don't lose the perfect view. For example, you may want to magnify your picture so that objects change size, perhaps allowing you to study them in more detail. The following sections show you how to work with different window views.
Most of the functions described can be accessed using the View menu, or using the picture pop-up menu. You can also change certain picture properties using VBA. Refer to Writing Scripts for more information.
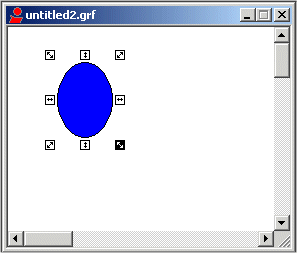
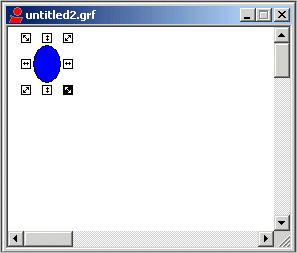
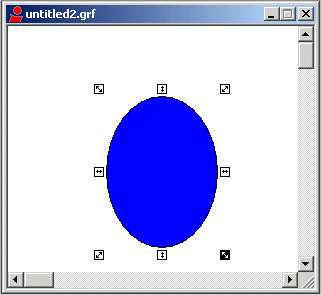
Zooming In and Out of Pictures
The viewing area of a picture is like an adjustable camera lens; it allows you to magnify or reduce the image on the screen. Magnifying an image (zooming in) lets you work on detailed areas of your picture. Reducing an image (zooming out) lets you work on the overall structure of the picture.
You can choose four different percentages of magnification when zooming in and out of pictures - 50%, 100%, 150%, or 200%. By default, the viewport is set at 100% view magnification, giving you the maximum viewable amount of your picture. When you change the magnification of the picture using the zoom function, you change the width and height of the picture's viewport, but not the size of the objects in the picture. Objects appear to get bigger or smaller, allowing you to view more or less detail, but they are actually the same size.
You can accomplish the same function of a zoom by simply pressing CTRL/SHIFT while clicking and dragging a corner of the window. This makes the object appear to change shape without changing the viewport, just like a zoom. Refer to the Key Sequences that Change the Picture Size table in Determining Window Size, earlier in this topic.
The following figures illustrate the four types of zoom magnifications for a simple picture.

Default View and Full View
After making changes to your window, you may decide that you prefer the original view. To restore the original view, right-click the picture and select Default View from the pop-up menu, or select Default View from the View menu. Your picture will appear as you originally created it before making any changes.
If you make the size of your window smaller, you can return the window to full screen by selecting Full View. The Full View function expands the size of the window and changes the viewport. You can also perform a full view by pressing <Shift> and dragging the window to fill the screen of the window.
Fitting the Picture to Window or Window to Picture
If you adjust the window size of your picture, you may want the objects in the picture to be accurately represented within the new window size. To fit the picture to the new window, right-click the picture name in the system tree and select Fit Picture to Window from the pop-up menu, or select Fit Picture to Window from the View menu. The picture is adjusted to the new window size such that the objects in the picture are the same size relative to the new window.
This action cannot be reversed. The picture is permanently sized to the window.
To adjust the size of the window to fit as much of your picture as possible, right-click the picture name in the system tree and select Fit Window to Picture from the pop-up menu, or select Fit Window to Picture from the View menu.
If the viewport stretches beyond the boundary of the picture, scroll bars are added to the picture.
Updating Window Location
The Update Window Location function allows you to retain a specific picture configuration, maintaining the document, window, and viewport sizes that you create. When you open the picture later, or switch back to the configuration environment after viewing it at run-time, the picture appears exactly as it did on the screen when you originally created it.
In this way, Update Window Location is not the same as saving your picture. Saving alone does not retain window properties, and does not guarantee that your picture will look exactly the same when you re-open it again at a later date. So be sure to save your picture after you have updated the window location to your exact specifications.
Update Window Location is an effective way to create pop-up windows for your application that appear exactly the same, regardless of what resolution they are viewed on. To use this function, right-click the picture in the system tree and select Update Window Location from the pop-up menu, or select Update Window Location from the View menu. Next, save your picture.
Selecting Window Properties
As discussed in the previous sections, the area of the window that you can resize is called the client area. Essentially, the screen is the window less decorative properties, or decorations. To give your pictures a custom design and look, you can select or modify the following window decorations:
-
Title bars - Adds a title bar to your picture.
-
System menus - Adds system menus to your picture.
-
Sizing borders - Adds sizing borders so that you can resize (or scroll) your window.
To show or hide the decorations listed above, select or deselect the appropriate check boxes in the Edit Picture dialog box.
Additionally, you can add the following window properties to your picture:
-
Always on Top - Configures the window so that it is always on top when you open it. You can select this feature in the Edit Picture dialog box, from the picture preferences tab in the User Preferences dialog box and from the Property Window.
-
Click and Stick Enabled - Allows you to view which objects can be selected, can perform actions, or can have actions performed on them. You can select this feature from the picture preferences tab in the User Preferences dialog box.
-
Grid Enabled - Displays a grid on the window. You can select this feature from the picture preferences tab in the User Preferences dialog box or from the Property Window.
-
Snap to Grid - Allows objects to snap to a grid point in a grid. You can select this feature from the picture preferences tab in the User Preferences dialog box and from the Property Window.
-
Runtime Visible - Allows you to run a picture in memory without a visible display in the run-time environment. You can select this feature in the Edit Picture dialog box and from the Property Window.
-
Disable caching for this picture - allows you to disable picture caching for an individual picture. You can select this feature in the Edit Picture dialog box. See Using Picture Caching for more information about picture caching.
Each of the available properties can be turned on or off, allowing you to create the exact look and feel you want. For example, you can:
-
Simulate dialog boxes by creating a window with the title bar and system menu enabled.
-
Create a tool palette for operators using a window with the sizing borders and system menu disabled.
-
Create an opening title screen by creating a window with the full screen enabled, and the other window properties disabled.
-
Simulate an alarm condition where an object makes a sound when the cursor passes over an object. Do this by creating a window with Click and Stick Enabled selected.
Creating Picture Types Using Window Properties
Use the following table as a guideline to help you define your picture properties.
|
To create a... |
Select these properties... |
|---|---|
|
Dialog box |
Titlebar System Menu Resizable |
|
Toolbar |
Titlebar System Menu Resizable Always on Top |
|
Palette or control panel |
Titlebar Always on Top |
|
Non-movable banner |
Always on Top |
|
Detail window |
Titlebar System Menu Resizable |
|
Pop-up alarm messages |
Titlebar System Menu Resizable Always on Top |
|
Resizable picture with hidden objects, not displayed at run-time |
Resizable |
For more information on the window and screen in a DeltaV Operate document, refer to The Window in the What Makes Up Your Picture topic.
Selecting Additional Picture Properties
The User Preferences dialog box contains several additional properties you can apply to your pictures. To access them click the Picture Preferences tab. The following properties are available in the right column of the Properties area:
-
Highlight Timeout Interval - When Click and Stick is enabled, this time period defines how long before the highlight around an object disappears when it is not selected.
-
Grid Interval - When the grid is enabled this interval, entered in logical units, determines the distance between the dots in the grid.
-
Using Click and Stick - Click and Stick allows you to view which objects can be selected, highlighted, or modified at run-time. As the mouse moves over an object, a single highlighted box clicks around the object if it is selectable. If the object is highlighted, use the mouse to select or stick the object and it becomes the current object. To enable or disable Click and Stick, select or deselect the Click and Stick Enabled check box.
-
The DeltaV Module Highlight Option- The DeltaV module highlight option allows you to select a faceplate, detail display or trend and have all datalinks pertaining to that module (including those within a dynamo) to display a highlight box around the datalink. This allows the operator to quickly see what datalinks pertain to which module. You can enable the module highlight option for an entire picture; that is, all datalinks and dynamos (if selected), on the picture have the option enabled. You can enable the module highlight option for selected datalinks and dynamos on the picture. When you enable this option, all other edge animations are replaced on the datalink.